Monday, June 22, 2020

The Perfect Little Cooker... How to Heat Your Meals and Beverages in the Field

One of the challenges of hiking/camping or simply "bugging out" in case of an emergency is being able to provide yourself with hot beverages and hot meals. Yes, you can buy meals ready to eat which can be consumed cold, and drink cold beverages and plain water, but there is something incredibly comforting in a hot meal and a hot drink, no matter the time of the year. Many would find it impossible to start a normal day without a hot cup of coffee, and that can go doubly so in cases of emergencies.

To be able to have hot food and drink you need to have a cooker. There are lots of choices out there, but the important features to look for are reliability and ease of lighting, time of the burn and top temperature reached in the case of solid fuel, and weight of the cooker and fuel.

Esbit Cooker

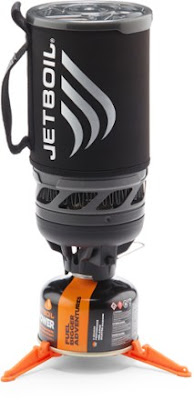
I started out with a Hexamine cooker, since I had one on hand I could easily throw into my kit, but decided to open things up for a re-examination of the Hexi cooker, putting it into a test with three other cookers, the Esbit, the Fire Dragon, and the JetBoil. The first three are solid fuel options, with the last using a fuel canister.

So, let's begin with weight:

                                   Weight of Cooker                     Weight of Single Fuel Tablet
Esbit                                   85g / 3oz                                          10g / 3/8oz
Hexamine                        134g / 4 3/4oz                                     26g / 7/8oz
Fire Dragon                     113g / 4oz                                           26g / 7/8oz
JetBoil                             355g / 12 1/2oz                                 198g / 7oz

(NOTE - The JetBoil cooker weight includes a cooking pot, which the other cookers do not include. The fuel for the JetBoil was a 100g/3.53oz fuel canister which will boil 12 litres of water, the equivalent of at least 24 fuel tablets of the other three stoves.)

Hexamine Cooker

On part one, lighting, the Fire Dragon and JetBoil both started immediately. The Hexi was an old tablet from military surplus and took some time to light. The Esbit, which smelled strongly of fish before lighting (that smell did not continue during the burn) was in a sealed packet in a recent purchase and also took some time to light.

For cook time the stoves gave the following results with 500ml of water in each case:

                                   Time of Burn                     Maximum Temperature Reached
Esbit                           14 min 15 sec                                  178 Fahrenheit
Hexamine                     8 min                                             186.8 Fahrenheit
Fire Dragon                10 min 50 sec                                  191 Fahrenheit
JetBoil                          2 min 12 sec                                  212 Fahrenheit

(NOTE - The start temperature of the water for the Esbit and Fire Dragon was 67.4 Fahrenheit, Hexi was 73.9 Fahrenheit, and JetBoil was 69.8 Fahrenheit. No lids were used to cover the water during heating.)

Fire Dragon Cooker

While only the JetBoil reached a rolling boil before the tablets burned out, the other three did produce water hot enough for a hot beverage or for a reheated meal/reconstituted dehydrated meal. If you are using your cooker to sanitize water, you would need more than one tablet of any of the tested fuels, except the JetBoil.

The Esbit and Hexi use a fuel tablet which produces toxic fumes and must be used in an open space. This fuel was discovered in 1859 and Esbit has been making their fuel since 1936. Hexi was used by the British Army for over 70 years. They burn completely away, but do leave a sticky black residue on the cooking pot which will require cleaning and scrubbing. The Hexi is packaged 8 tablets in a waxed cardboard box which can be used as a Firestarter to help get the tablets started. The Esbit has plastic packaging which will need to be packed out and disposed of properly. The Fire Dragon is an environmentally sound alcohol based fuel burns clean, but does have plastic packaging which needs to be packed out and disposed of properly. It replaced Hexi in the British Army in 2017. While shipped as a solid, it quickly liquifies when ignited and must be used in a leakproof container. Their cooker is ideally suited for this. The JetBoil fuel canister is made of metal and will also need to be disposed of properly.

JetBoil Cooker

Both the Esbit and Hexi produced a good heat, but due to the stove configuration, made the handles of the Crusader mug used to heat the water too hot to handle with bare hands. The Fire Dragon cooker comes with a wind screen, and with the handles of the Crusader mug place behind the wind screen, kept the handles cook to the touch. The JetBoil pot is insulated and while warmer that the mug used with the Fire Dragon, was comfortable to handle.

I ran these tests with someone with no camping experience, and no experience with any of these cookers. They were responsible for the set up and lighting of each cooker. Based on the test results and the easy and safety of use, the Fire Dragon and the JetBoil were the two top cookers. The Fire Dragon for the non toxicity issues in handling the fuel as well as fumes, and the ease of lighting. The Jet Boil for the rapid time to reach a rolling boil and ease of lighting. The Fire Dragon however did not reach a rolling boil with one fuel tablet and the JetBoil was described as "a bit fiddly" for the assembly needed for the cooker before use.

It is really a personal choice when it comes to selecting a cooker, what is your specific need, weight requirements, ease of use, and cost. These will vary from person to person and each of the stoves I tested has a solid following, with all of them continuing to be commercially available.

I've personally decided to replace the Hexi in my 24 Hour Kit with the Fire Dragon, and I will be putting the JetBoil in my larger evacuation bag.

As for everyone else, I recommend you test out your kit and become comfortable with its use and every so often, perhaps give something else a try. I did and I've become a convert to two new cookers.

Packing the Vest of the "Get Home Bag"...

This is a follow-up to an earlier post on part of my "get home bag." I finally kitted it out nearly completely and thought I'd provide an update. (Note - I have since moved away from this vest concept to something lese which I will post about, but wanted to provide the information about how I packed this concept in case anyone was interested.)

This part is based around the British Army tactical load carrying ensemble vest (nsn 8415-99-461-4932). Now I'll again be the first to admit that I was very reluctant to buy anything with the word tactical in its name as part of my emergency kit. I don't have weapons nor do I intend to have any with me so the need for something labeled as "tactical" was a bit tough for me to reconcile. And this vest was designed for an entirely different purpose than my own.

But after reading about the vest online and doing some further research, I decided to give it a try. It came brand new in the original packaging, one vest and 13 pouches. The vest is covered in loops of webbing that is known as the pouch attachment ladder system or PALS. This means that pouches can be attached anywhere on the vest and are secured so they will not "flap about."

This vest came with 3 large utility pouches, 1 small utility pouch, 1 flashlight/knife pouch, 1 medical pouch, 1 canteen pouch, 2 ammunition pouches and 4 grenade pouches. I have no use for grenade pouches so I haven't used them. The ammunition pouches are perfect for my thermal drinking mugs so they have been retained for use.

All of the pouches have a rubberized lining and a secure clip to keep them closed. The large utility pouches have a drawstring cover inside the lid to really keep the contents dry. The knife/flashlight pouch uses a simple velcro closure.


The vest also has two small and two large pockets inside the front of the vest which are easy to access and even in the cold, with gloves on, were easy to open and a great place to stuff my gloves when I needed the dexterity of my bare hands.

With its wide shoulder straps, this vest has the ability to distribute the weight of its contents in such a way that it does not cut into your shoulders, and with the internal mesh construction, does not allow heat to build up between your body and the vest. The combination of Fastex clips and Spanish tabs allow all the pouches and the front of the vest itself to close quickly and easily.

With the PALS fittings, you can arrange the pouches in any way you wish to suit your needs, and while the version I bought came with 13 pouches, some come without pouches and additional pouches are available for purchase from a variety of sources, so you can customize it as you see fit.

I decided to set my vest up using the manufacturers suggested layout as a starting place, omitting the four pouches I  mentioned earlier. I've also added a Gerber knife pouch for my utility tool.

Now I've finally decided upon the contents of the pouches and will go over the contents below:

Water Bottle Pouch
Litre Water Bottle
Metal Drinking Mug
Pouch SA80 Ammunition
Thermal Drinking Mug
Pouch SA80 Ammunition
Thermal Drinking Mug
Pouch Medical
Joint Services Dressing First Aid Field Camouflaged Sterile 20cmx19cm
(4) Adhesive Bandage, 1 inch x 3 inches
(1) Gauze Dressing, 4-1/2 inches x 4-1/10 yard
(2) Anti-Bacterial Towlettes
(1) SPF 30 Sun Protection Towlette
(1) 30% DEET Towelette
(2) Ceralyte 70
Utility Pouch-Small
Magnetic Compass
Signal Mirror
Para Cord in 2 Short Lengths
(2) Red Cylume Lightsticks
Watertight Plastic Match Case
(10) Flat Pack Lifeboat Matches (in Match Case)
Striker Boards (in Match Case)
Mini Compass (in Match Case)
2 Wetfire Fuel Cubes
Utility Pouch
Apricot Jam
Digestive Biscuits
Caramel Cereal Bar
Blackcurrant Fruit Grains
BBQ Peanuts
Peanut Butter
Strawberry Boiled Sweets
Fruity Oatie Biscuit
Beverage Whitener x4
Instant Coffee x2
Teabags x2
Water Purification Tablets x6
Hot Pepper Sauce
Sugar x4
Tissues
Matches 1 x5
Spearmint, Strong Mint and Peppermint Dental Chewing Gum
Wet Wipes x2
Spork
Re-usable Poly Bag
Knife/Torch Pouch
Gerber Onyx 50 Torch
Utility Pouch
Instant Porridge
Mexican Tuna Pasta
Sausage Casserole
Chocolate Brownie
Fruit Puree Strawberry/Banana/Apple
Tuna Lime & Pepper
Cola Drink
Tooty Fruity Drink
Utility Pouch
Hexamethylene Tetramine (Hexamine) Solid Fuel Cooker
Spare Laces
Scotchbrite
Exotic Fortified Drink
Tropical Drink
Hot Chocolate Orange

The vest and all the contents, less the water, weigh about 12 pounds. Considering the contents here are to keep me healthy and fed for 24 hours (the food listed will provide me about 2400 calories), I don't think that is a bad weight and in combination with the other park of my "get home" bag weight a total of 35 pounds, including a complete change of clothes for the 37 mile walk home, I don't think that is a bad arrangement.

After hiking 2 1/2 hours in temperatures from 15 to 25 degrees Fahrenheit this vest was still very comfortable and I was not sweaty underneath, which could result in a chill in those low temperatures.

I found my vest at Military Uniform Supply.com where they offered the vest and 13 pouches new in the original packaging for $29.99.

Tuesday, June 16, 2020

Short Term Survival... Ideas for a 72 Hour Survival and Minor Medical Kit

Sometimes the most daunting task in putting together any kit is selecting the container for the kit as well as the contents. Sure you could go out and buy something pre-packaged, but that is not always the best solution. They tend to be overkill or inadequate for your own needs and many times the quality can be lacking, for the sake of convenience.

My goal was to create a small kit for injuries and survival. This was only to be for 3 days and was a "lost in the woods" concept. Something I could throw in the car for emergencies, throw in a day pack for a hike, or have in my get home bag for minor emergencies. This was not designed to be for injuries requiring any additional medical care.

So to start I bought two pouches, one for the medical kit and one for the survival kit. This set the size parameters for the kit. I wanted something fairly compact and durable. What I selected were the British Army small utility pouch (NSN 8415-99-461-4935) and the British Army medical pouch (NSN 8465-99-480-8051), both of which were designed for the British Army Tactical Load Carrying Ensemble Vest (NSN 8415-99-461-4932). The small utility pouch was introduced into service in 2007 and the medical pouch was introduced into service in 2005. The pouches are made of heavy duty nylon with quick release catches that are easy to open and close with only one hand. They also are rubberized on the inside for added water repellency.

One I'd settled on the containers, it was time to settle on the contents. I'd done a fair bot of online research and finally used the packing lists for the USAF medical and survival kits as my jumping off point. Designed for short duration, perhaps 2 1/2 days, they did not go too far in their list and provided some items of which I had not thought previously.

The Survival Kit is fairly basic and designed to provide fire lighting capabilities, clean water, and devices to be found if "lost in the woods." This I packed in the British Army small utility pouch. The products were selected based on suppliers used by the USAF. The Leatherman Squirt provides a small but useful multi tool. The watertight match case is packed with lifeboat/hurricane matches which will light in rain and high winds and burn like a flare. Also in the case is a mini compass. The water purification tablets will produce 2 1/2 gallons of safe drinking water. The Wetfire cubes might be unknown to many, but they will burn even when wet and are an incredible fire starter. You just cut off shavings and place them over the kindling you have collected and they will help get the fire started in the most wet conditions. The signal mirror, like the whistle is for signaling help if you are "lost in the woods." And the Camovat cravat is both water repellant as well as has an anti-microbial treatment, making it perhaps more of a medical item, but still very handy and selected over other cravats because of the water repellant characteristics. None of these items has an expiration date.


Contents of the Survival Kit:
Leatherman Mini Tool w/Pliers (Leatherman Squirt PS4)
Watertight Plastic Match Case
Mini Sparking Flint Striker (Spark-Lite)
(10) Flat Pack Lifeboat Matches (in Match Case)
Striker Boards (in Match Case)
Mini Compass (in Match Case)
(10) Water Purification Tablets
(2) Wetfire Fuel Cubes
Signal Mirror w/Lanyard (Ultimate Survival Technologies)
Flat Whistle w/Lanyard
Camouflage Cravat, 37 inches by 52 inches, w/two 2-inch #3 safety pins (Camovat)

The Medical Kit is also fairly basic and designed for fairly minor injuries. This I packed in the British Army medical pouch. These products were also selected based on suppliers used by the USAF. Also designed for short duration, perhaps 2 1/2 days, they provided some items of which I had again not thought previously.


The Medical Kit is fairly basic and designed to provide basic minor first aid treatment, the sort of thing you would expect from a bathroom cupboard or for a day hike. Anything more major and you are looking at regular medical care. This I packed in the British Army medical pouch. The products were selected based on suppliers used by the USAF. 

In packing these items, I placed many of them in thick plastic zip lock bags, to help not only keep them waterproofed, but also to help keep them organized. I've selected two different sizes of adhesive bandages, each packaged separately. I've also included a vacuum packed gauze dressing. There is a roll of reinforced adhesive tape, duct tape, included for secure emergency taping. For wound care I have anti-bacterial towelettes and bacitracin ointment. There are also towelettes for sun protection and insect repellent in the kit. I've included two packets of anti dehydration drink in the kit for moderate dehydration. Ceralyte also has a version for mild dehydration, but I decided to follow the USAF kit and include the moderate version. To finish off the kit are four safety pins and a Cyalume chemlight, the later which is designed to be used to locate you should you be lost in the woods.

All the items are listed below and once again designed for emergency medical care of minor wounds for a limited time in the woods. Its a basic starting out point and even though I am working to create a larger kit, this will remain part of my essential gear carried on me, and not in a rucksack.

Also be aware that some of these items have expiry dates and the kit should be checked regularly to ensure expired items are replaced. Some can be used as training aids after replacement.

Contents of the Medical Kit:
(4) Adhesive Bandage, 1 inch x 3 inches (Band-Aid)
(4) Adhesive Bandage, 2 inches x 4 1/2 inches (Band-Aid)
Gauze Dressing, 4 1/2 inches x 4 1/2 yards (H&H PRIMED-002)
Tape, Rolled Reinforced, 2 inches x 100 inches
(2) Bacitracin Ointment 0.9gram (Moore Medical)
(2) Anti-Bacterial Towelettes, (Dynarex BZK Antiseptic Towelettes)
SPF 30 Sun Protection Towelette (Coretex Sunx SPF30+)
30% DEET Towelette (Coretex Bugx30)
(2) Ceralyte 70 Lemon (10g)
(4) Safety Pins, 2 inches, #3
Cyalume SOS Green Chemlight, 4 inches, 8 hr


I hope this helps give some ideas for your own basic survival and medical kit.